Showing posts with label quilting. Show all posts

Tuesday, August 28, 2012

How Long Does It Take To Bind A Quilt?

Evidently for me, a traditional quilt binding can take 9 years, lol.

I don't make many utilitarian quilts and I've never liked sewing traditional quilt bindings, but I made this 'modern' quilt for the bedroom we renovated in our house in Austin Texas almost 10 years ago!
Front                                                                                    Back

Shortly after the room in Austin was finished, we moved back to Los Angeles and 2 years later we moved to Chicago. I guess with all the work of moving and resettling twice in a fairly short period of time, I kind of lost steam and forgot about finishing the quilt.

I decided, it was time to finish the quilt before I pack it up and was shocked when I counted how many years that quilt has been without a binding.

I look forward to sleeping under this quilt in a few months when I get resettled in Northern California!

Thursday, June 21, 2012

New Class! Alternatively Bound and Stitched

I'm really excited to tell you about my new class, Alternatively Bound and Stitched, that I will be teaching in Long Beach at International Quilt Festival, Thursday, July 26th.

The focus of this class is not only learning 3 alternative binding techniques that work great with art quilts but also developing strategies for free-motion quilting designs, making a quilt sandwich, discussing; batting, basting, threads and needles, transferring designs to fabric and marking quilts for stitching more complex designs.

Along with making quilted and bound samples in class, there will also be a powerpoint with examples of different ways to think about what kind of stitching motifs to use for quilting.

As I began writing the handout for the class last fall, I found that I had so much information that I wanted to include, that it became a 17 page ebook! that each student will get on a disk in class.

The ebook is a pdf and can be uploaded to a tablet and opened in either kindle, ibooks or other apps for reading pdfs.
I emailed myself the pdf and opened it on my ipad and it worked beautifully.

I have already been asked about selling the ebook, which I will probably do when I have a chance to figure out the best way to do it. Right now I have A LOT on my plate to deal with, so please bear with me. Hopefully in the fall after I've moved and resettled I can get to it. In the meantime come take my class! ;-)

Thursday, March 15, 2012

Hectic days, an old artquilt gets a face lift and spring fever.


I've had so much going on the last couple weeks it's been hard to sit down and write. Between my recent travels, I sold two quilts to a friend/collector who's moving to England and sent my daughter Indigo off on a last minute month long trip to help her get set up in her new place.

Getting Indigo off was an adventure in itself with procuring an expedited passport. Because of her less than traditional upbringing, moving many times over the years, being homeschooled for half that time and working as an artist/photographer herself, she's pretty much off the grid and having a hispanic last name probably didn't help. Her passport was stalled 3 times for requests for more information and identification. The most outlandish information requested was whether her mother had prenatal care and when the appointments were. Really?!?! Who the heck remembers that after 22 years!

When my friend asked me to show her what was available, I knew I had two quilts that would resonate with her. She has been going through a difficult divorce along the same time line as me and we have shared a lot over the last few years. So I felt like she needed to see 3 of Swords.


This quilt is about feeling torn open and raw (with exposed painted red batting) from betrayal and loss but finding peace while working through the pain and creating something beautiful from it.


The other quilt, Joan of Arc, hasn't seen the light of day in many years. I made it in 1999 after going through a breast cancer scare and lumpectomy that thankfully turned out to be benign. The style of this quilt seemed like a good fit for the historic town she was moving to and she was coincidentally dealing with a questionable mammogram the week I showed it to her.

This quilt is pieced and appliqued with painted and hand dyed fabric. I felt that before I could pass it on it needed a little more work, so I put a new back on it to help it structurally to hang better and added more quilting in several areas, near the sun, moon, flames and most importantly the horse.


I had a lot of fun adding ornate decorative quilting stitches to the horse, thinking about all the carved stonework in the gothic architecture of England.

I am happy these two pieces have found such a perfect new home.

Now I'm having a hard time sitting at the computer when I really want to be outside enjoying the beautiful unseasonably warm weather we are having. Who could imagine Chicago would be 80° in March!

Wednesday, January 18, 2012

In the home stretch...

The quilting is done!

I chose to do my curvy meandering fill stitching that is reminiscent of leaves and flourish-y shapes in the white background areas to contrast all the linear stitching on the cups and flourishes.

I stitched with Bottomline thread which is generally used in the bobbin, it's a lighter weight thread, because I wanted the stitched lines to be more subtle.

Next:
cropping and binding.


What I learned...
Because I like experimenting and trying things differently, I always learn something new with every project. Sometimes I discover a great new way of working and sometimes it turns out that my initial idea created unexpected challenges or wasn't as successful as I'd hoped.


As you may recall, I used wool rayon felt instead of batting, because I wanted a flat smooth finish for this piece. I used felt a friend had given me that she most likely had sitting around for about 15 years. I had two issues that popped up from using this.

The first one was the stiffness of the felt, compared to batting, made it more difficult for manipulating under the harp of the machine. I think 30 inches would be the widest I would recommend working with felt. Wider than that and I could see some definite limitations to quilting the surface smoothly. I had to roll and fold the piece to work the central areas which sometimes got a little cumbersome.


The second issue came about after I fused my top to the felt. I had a fair amount of rippling of the top due to it not fusing completely in all areas or staying fused for the duration of the quilting (it's possible there may have been a finish on the felt that kept it from adhering), as well as some possible shrinkage of the felt by the high temperature and steam used while fusing.


After the cups and flourishes had been quilted there was a significant amount of buckling in the white areas, I don't think the fusible web was even sticking anymore at that point, luckily the open areas were not very large, maybe 9" at the widest so it didn't present too much of a problem and it all smoothed out nicely with the quilting.


Conclusion: would I use felt again? Yes, but I would take size into consideration, if I was working on a particularly large piece I would probably use a lightweight batting instead. I would also pretest the wool to make sure I didn't have a problem with adhesion when fusing. I think a newer piece of wool felt wouldn't have had the adhesion problems that this one had, I suspect it had a finish on it.

Friday, January 13, 2012

8 of Cups progress


I have been really loving spending time stitching! There are some other things I really should be doing, but I am feeling so in the groove right now, I don't want to stop.


I decided to continue using monofilament for stitching the feathery flourishes since I do not want to obscure this part of the painted surface with lines of thread and because the monofilament is relatively clear, the more noticeable holes punched by the needle through the fabric gives another kind of visual patterning that I think is kind of interesting.


Next, I'll begin to fill in the white areas using Bottom Line white thread.

Chicago's first winter snowstorm today, stay warm.

Monday, January 09, 2012

Have you ever been challenged by monofilament?

Monofilament is clear thread, similar to a light weight fishing line that is a perfect solution when you need to add stitching but don't want the thread to be prominent. I personally love MonoPoly by Superior, it's a strong, matte, polyester thread that comes in clear for light to medium colors of fabric and smoke to be used with medium to dark colors.

Monofilament can be technically challenging when sewing if you don't make a few tension adjustments to your machine and adjust how your spool unwinds.

The biggest problem: Tangling and breaking. When you slow down or stop sewing and the tension is let up on monofilament, because of its natural elastic springy nature, it keeps unwinding and spins around the back of the spool, causing the thread to break.

Using a thread stand helps but, as soon as the tension is off (ie slowing down or stopping) the thread tends to spin around the spindle either above or (worse) below the spool. Snap!

Solution: place the spool in a bowl next to the thread stand and run the monofilament up through the top hook of the stand and then over to the machine.

Use a thread guide on your thread spindle to help control that active thread.

Second problem: Tight thread tension. Monofilament, like metallic thread, requires a looser tension setting on the machine. 

Solution part 1: Loosen the top thread tension, the lower the number the lower the tension.

When I first started quilting 20+ years ago, it was not recommended to put monofilament in your bobbin as well as the top. I can no longer remember exactly why, but I've never had a problem, maybe the quality of the thread is a lot better now. Also some machines are just finicky about thread, if your machine has issues, try something like Bottom Line in the bobbin. 

Solution part 2: Loosen the tension on the bobbin case. Make a quarter turn on the top larger screw, usually counter clockwise. I guess that depends on how you're holding the bobbin, for mine if the thread is on the left side, it's counter clockwise. 

It's easy to check if it's looser by letting your bobbin dangle when holding the thread. It should drop down a little bit. If you are afraid to mess with the tension screw on your bobbin case, buy another spare and mark it with a dot of fingernail polish.

Lastly I recommend using a top stitch needle, my favorites are the titanium ones.

Following these easy steps you should never have problems stitching with monofilament.


Saturday, December 31, 2011

Things were humming along and then...snap!


Isn't it ironic that my free-motion presser foot breaks at strength?! LOL

Well as frustrating as that is I suppose I shouldn't be too surprised, this machine is over 20 years old and it is my favorite so it gets a lot of use. Luckily I found a replacement online pretty quick and have ordered a new foot.


I've been stitching the cups first, adding strong black lines to echo the illustration style of the vintage anatomical heart engraving and using monofilament across the rest of the cup to secure the fabric but not add as much visual texture.


Happy New Year!!!
I am definitely ready for a new one, things have got to start getting better!

Thursday, November 24, 2011

8 of Cups progress

I am finally getting some time to work on my latest piece. I decided I want the quilting to have less loft and dimension and instead have more stitched illustrative details, so I am using wool felt instead of batting. Luckily I had a big piece of yellow felt that a friend gave me during a recent purging that was just the right size.

I placed a layer of Mistyfuse between the felt and the painted top and did the same with the back. I wouldn't do this with batting because the fusible web penetrates the batting, glueing both the top and back together reducing the loft of the batting, but for this project that is not a problem.

For the back I used left over fabrics that had mistyfuse already adhered to them from the Agave quilt I made several years ago. I don't do fusible applique very often so the fabrics have just been sitting on the shelf not getting used.

For the quilting on the cups, I am using back thread in an illustrative way, using it to create more visual dimension that looks more like drawn lines.


That's it so far, I don't think I will make very fast progress on this piece right now. I have a very busy couple of months ahead of me, not only with the holidays, but I need to start clearing out possessions and get my place ready to put on the market in January. I am planning to move back to California in the spring. I need to stop living in the limbo I've been in the last three years and take my life back and that begins with moving and getting my divorce finalized. Never thought I'd be starting my life over at this age, but hey if it doesn't kill ya, it will make you stronger right?

Thursday, March 10, 2011

Down the home stretch

Two months ago I began this painting for a quilt, unfortunately it got put on hold because several writing projects came up. I have been very quiet the last two weeks because I had to get back to work on it full time to make the deadline for it this week.

When I prepare a whole cloth painting for quilting my secret weapon is Mistyfuse. I am not fond of basting and when I discovered Mistyfuse could replace hours of tedious basting with fantastic results, I never looked back. I love this product and never make a quilt without it anymore.

I place my painted fabric face down on a surface I can iron on. For that I have a large plywood board wrapped with batting and muslin that I put on top of my work table. Then I cover the back of the fabric with a layer of Mistyfuse.

That roll is a bolt of mistyfuse.


Mistyfuse is as light as a spider web with delicate little strands of fusible adhesive, which will not change the hand of the fabric at all.


I lay a large silicon pressing sheet or parchment paper over the top and iron at the hottest setting.


After the whole back is covered with Mistyfuse, I put a bed sheet on the floor and spread the wool batting out on top. Next, I put the quilt top on with the Mistyfuse side down on the batting. Starting in the center of the fabric and working my way concentrically outward, I iron it on the hottest setting, fusing the top to the batting.

Then I turn the whole thing over, with the painted fabric face down on the sheet. I cut one to two inch squares of Mistyfuse and place them in a loose grid approximately 6 to 8 inches apart across the batting. I carefully lay the backing fabric over the top and iron the surface, which effectively spot fuses the back fabric to the batting.

And then I begin quilting.


When the quilting is finished, I block the quilt by pinning it to the carpet and steaming it. This smooths it out, puffs up the batting and makes the quilt lay flat.

Next it's important to make sure the quilt is square by using large straight edges and triangles to check all the corners.


I use a Bohin chalk pencil to mark the finished size of the quilt for cutting.


Then I trim the excess quilted fabric away leaving an extra 1/4 inch seam allowance all the way around to sew the binding to.


I prefer a faced binding which is not visible from the front the quilt, giving it a nice clean finished edge.
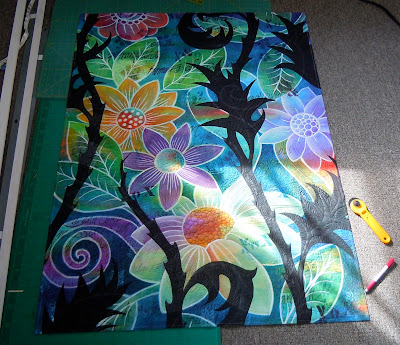
Black and Bloom All Over

Finished size 36" x 48".  Lastly I have to stitch the binding down in back, then sew on a sleeve and label, but that can wait while I get back to other tasks, like cutting fabric for my classes next week. 

LinkWithin

Related Posts with Thumbnails