Showing posts with label tutorials. Show all posts

Thursday, May 10, 2012

Painted ipad Bag

I have been wanting to buy a case for my 'new' ipad, but have held off because I read the ipad 2 cases didn't work with the new ipads because they moved the magnet that puts it in sleep mode when you close the cover and there aren't that many options in covers for the new ipads yet, so in the mean time I've had nothing to protect it when I'm not using it and need to transport it.

I decided to sew a simple bag from canvas with a piece of thick wool felt sewn into it as a cushioned liner. I had no intentions of doing anything fancy, just a simple temporary bag that was purely utilitarian. This did the job and suited me just fine... for a few days.

But the lure of that blank canvas was too much.
I pulled out a few printed tea bags, abaca paper and matte gel medium and glued a few images down.
Then I painted a layer of clear gesso over the whole bag. Gesso is a way to prep the canvas for paint and clear gesso would not cover the printed images the way white gesso would.
Using acrylic inks, I brushed on some random color. When I build up layers of painted imagery, I like to start by putting down some primary colors, mainly warm yellows and cool red, because when I paint blues over them I'll get greens and purples. I especially like yellow as a base color because it is light, bright and transparant and I can always go darker with layers of color over the top.
With pencil I drew a few images on the canvas, white pencils are always nice if you can't see pencil lines very well.
Then I painted the background with deep blues and turquoise. You can see some of the colors are translucent letting the printed images and color from below show through and some of the colors, like the turquoise, are opaque.
 I used a black sharpie to give more definition to the simple graphic shapes

I still havent decided on what kind of closure if any I'm going to put on the bag, for now I just fold it over and that works fine.


Thursday, May 03, 2012

How Can You Resist Such a Simple Technique?

One fun little technique I found works great with acrylic inks (this would also work with Tsukineko inks) is to draw on fabric with a colored pencil or china marker and paint over it like a simple resist. Kind of like in grammar school when you colored with crayons and painted india ink over the top.

So why pencil versus china marker? Simply, pencil will give you a thinner defined line and the china marker a thicker heavier line.

In this case brand does matter. The first sample, if you can see it, was written with a Blick store brand white colored pencil and the second was a Berol Prismacolor white pencil. The Blick pencil was not as creamy and waxy and did not create a very good resist, the ink painted right over it.

If you are unfamiliar with china markers, they are a pencil that can write on a non-porous surface, like plastic, glass or metal and then can be wiped of with a firm rub with a dry cloth.
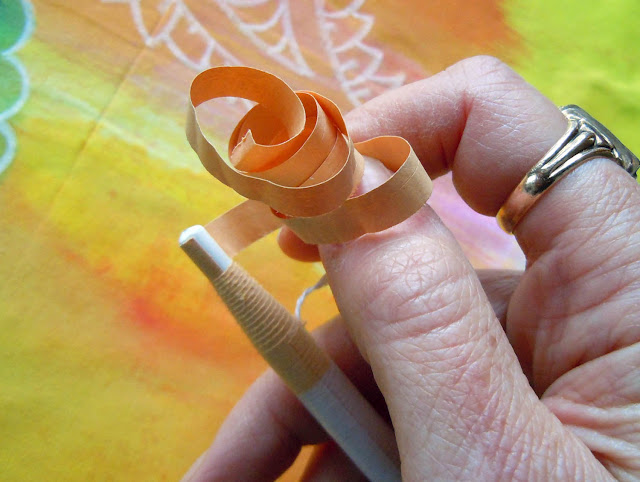
You don't sharpen them, instead you peel back the paper wrap covering by grasping that little string and pulling it back to the first perforated row
 grab the paper, unwind it
 then draw.
This is a sample I worked on in the acrylic inks class, layering up multiple different techniques.
The thick white lines are textile paint, the thinner flower vine pattern in the center of the paisley is china marker.
The little pale blue crosses in the background were also drawn with white china marker and then painted over with blue ink. I like how they show up really well and have a hint of blue.
I painted over the center of the paisley with red ink.
The pencil does not penetrate the fibers like a gutta resist, so if you have a lot of ink on your brush and the fabric gets really wet it will bleed beyond the pencil lines, but the white lines of the drawn imagery will show through, which to me is the effect I really like.
I painted inside the flowers and leaves with red-violet ink to make them stand out more. The benefit of the china marker was that I could quickly add color without being too fussy and neat because it kept the ink fairly contained.

Voila!

Wednesday, February 22, 2012

Felted Eggs


Well over the weekend I took the plunge and created a Pinterest account since so many of my friends are on there and see what I've been missing.

While I was poking around I saw quite a few pretty dyed eggs and although this seems a little early, I thought it might be fun to make some felted eggs.

After all they aren't going to spoil between now and Easter :-)

It might be fun to also add some decorative stitching with embroidery floss and adding some cut out wool felt shapes.


If you'd like to make some too, you can follow this tutorial, just roll your yarn balls into oval egg shapes.

This is a great way to use up leftover wool yarn. Rolling golf ball size yarn balls as a base for the ball. Wind yarn into oblong shapes to get a berry shaped ball.


I usually use wool yarn for the center because I know it will felt better, but in a pinch I have used other yarns too. My favorite place to order roving is from Outback Fibers, the colors are gorgeous and the prices are very reasonable. 


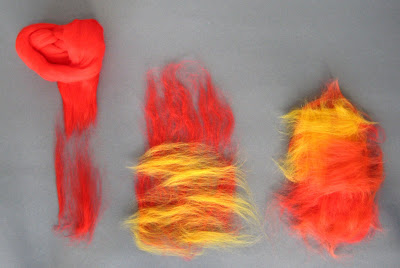
Unwind a length of roving, while holding it in one hand, grasp the end portion with the other hand and gently pull off "tufts" roughly 5-6 inches in length. Spread the fibers into a thin flat layer with all the strands going in one direction. Pull off another tuft of roving and layer it on top of the first at a 90 degree angle. Repeat this process several more times, criss-crossing 4-6 thin layers.


When lifting the blanket of roving there should not be thin spots or holes. Changing the colors of yarn in the layers will create a heathered multicolored wool ball.


Wrap the roving blanket you have created around a yarn ball, making sure there is full coverage of fluffy roving with no bare or thin spots.


Close the roving covered yarn ball in your hand and bring it to the foot of a knee hi panty hose. (buy cheap ones at the dollar store, or use those ancient ones in the back of your hosiery drawer that you never wear anymore) Gently remove your hand from around the ball pulling the hose tightly around the roving ball then tie a small piece of yarn to secure the ball in place.


When all the balls have been wrapped in the hose, place them in the washing machine, set the water to lowest level and hottest setting. Add a small amount of detergent, about a tablespoon, the exact measurement is not crucial but soap is important in the felting process. I usually run it on a long cycle, the more agitation the better the felting. Good old fashion top loading washers have the most success with felting.
When you take the chain of balls out of the machine, you will see little fibers have come though the mesh of the hose. Snip the tied yarn between the balls, gently peel away the hose removing the ball and roll the ball in your hands to smooth the fibers.
Click here to watch a video tutorial to make felted pumpkins which start with a basic felted ball.

Monday, February 06, 2012

Conversation Hearts

As valentines Day is coming up I thought I would repost this simple little Valentine project from last year.


Wanting to share a little Valentine's Day love, I decided to sew up some conversation hearts for the special people in my life.


I stamped endearments on wool felt and cut a paper heart to use as a template for cutting them out.


Each heart was stuffed with a smaller heart of wool batting and stitched with floss or pearl cotton.


Share the Love!

Sunday, January 29, 2012

heARTfest Blog Hop Day 5 Chocolate Peppermint Cream Heart Cakes

Chocolate Peppermint Cream Heart Cakes


Zucchini Chocolate Cake
2 cups flour
2 cups sugar
1/2 cup unsweetened cocoa
1 tsp baking powder
1 tsp baking soda           
1/2 tsp salt
3 cups shredded zucchini
1 cup semisweet chocolate baking chips
1 cup salad oil
4 large eggs

In a large bowl, mix flour, sugar, cocoa, baking powder, baking soda, and salt. Stir in zucchini, and chocolate chips. In a small bowl, beat oil to mix with eggs; add to dry mixture and stir to moisten well.
Line two large jelly roll pans with parchment paper, crease corners to fit and spread half the batter in each pan. Bake in a 325° oven until a toothpick inserted in center comes out clean, 15-20 minutes.
While cake is cooling make peppermint cream filling.

Peppermint Cream
2 sticks (1 cup) unsalted butter, softened
1 cup granulated sugar
1 cup whole milk
1/4 cup sifted all-purpose flour
1 teaspoons vanilla extract
1  1/2 teaspoon peppermint extract
red food coloring

Cream the butter with a mixer on medium speed until soft about 30 seconds. Add the sugar and beat on high speed until light and fluffy, 5 to 7 minutes.

In a small saucepan, combine 1/4 cup of the milk, the flour, and the vanilla extract, and whisk until there are no lumps. Over medium heat, slowly add the remaining 3/4 cup milk, whisking constantly, and cook until the mixture comes to a low boil. Then reduce the heat to low and keep whisking for a few more minutes, until the mixture starts to thicken.

Immediately remove the pan from the heat, but keep stirring and cool to room temperature. If necessary, place the pan over a bowl of ice water to stop the cooking process and allow the mixture to cool.

With the mixer on low speed, slowly pour the milk mixture into the butter-sugar mixture. Increase the speed to medium and beat until the frosting is light and fluffy, 3 to 5 minutes. Add peppermint to combine.


After cake has cooled use a heart shaped cookie cutter and cut out cake hearts and place on a clean piece of parchment. One pan had thicker hearts so I made those the bottoms and the thinner hearts the tops.

Place peppermint cream in a large ziplock bag, snip corner and squeeze out cream onto half the hearts and place a second heart on top.


Now you could stop here or you could keep going by cutting some heart stencils and and dusting the hearts with powdered sugar.

 What can I say, Indigo and I were doing this together, lol
Indigo perfected the dusting process by finding if you brush the remaining powder sugar off the stencil before lifting it you get a cleaner design.


Here's some of the stencils we made


 Enjoy!


Check out all these LOVE infused tutorials
Jane LaFazio's Sketchbook page to Valentine Card (& envelope too)
Traci Bunkers, Printed Heart Ice Cube Trays: Quick Printed Backgrounds, Part 1
Diana Trout's, Woven Heart Valentines Card
Lyric Kinard's,  Lovin' my Thermofax Screens
Judy Coates Perez  Chocolate Peppermint Cream Heart Cakes
Kelli Nina Perkins, Monday, Jan 30 Heart shaped felted soap
Melanie Testa, Tuesday, Jan 31
Tracie Lynn Huskamp, Wednesday February 1 Valentines Message Pillows 

LinkWithin

Related Posts with Thumbnails