Tweet
Pages
▼
Tuesday, January 31, 2012
And the lucky winner is...
Tweet
heARTfest blog hop day 7
Get your heart on for this round of LOVE infused tutorials!
Check out Melanie Testa's, Vintage Inspired Valentine card
Jane LaFazio's Sketchbook page to Valentine Card (& envelope too)
Traci Bunkers, Printed Heart Ice Cube Trays: Quick Printed Backgrounds, Part 1
Diana Trout's, Woven Heart Valentines Card
Judy Coates Perez, Sunday, Jan 29, Chocolate Peppermint Cream Heart Cakes
Lyric Kinard's, Lovin' my Thermofax Screens
Kelli Nina Perkins, Heart shaped felted soap
Tracie Lynn Huskamp, Wednesday February 1 Valentines Message PillowsDiana Trout's, Woven Heart Valentines Card
Judy Coates Perez, Sunday, Jan 29, Chocolate Peppermint Cream Heart Cakes
Lyric Kinard's, Lovin' my Thermofax Screens
Kelli Nina Perkins, Heart shaped felted soap
Tweet
Monday, January 30, 2012
heARTfest blog hop Day 6
Get your heart on for this round of LOVE infused tutorials!
Check out Kelli Nina Perkins, Heart shaped felted soap
Jane LaFazio's Sketchbook page to Valentine Card (& envelope too)
Tweet
Jane LaFazio's Sketchbook page to Valentine Card (& envelope too)
Traci Bunkers, Printed Heart Ice Cube Trays: Quick Printed Backgrounds, Part 1
Diana Trout's, Woven Heart Valentines Card
Judy Coates Perez, Sunday, Jan 29, Chocolate Peppermint Cream Heart Cakes
Lyric Kinard's, Lovin' my Thermofax Screens
Diana Trout's, Woven Heart Valentines Card
Judy Coates Perez, Sunday, Jan 29, Chocolate Peppermint Cream Heart Cakes
Lyric Kinard's, Lovin' my Thermofax Screens
Melanie Testa, Tuesday, Jan 31
Tracie Lynn Huskamp, Wednesday February 1 Valentines Message PillowsTweet
Sunday, January 29, 2012
heARTfest Blog Hop Day 5 Chocolate Peppermint Cream Heart Cakes
Chocolate Peppermint Cream Heart Cakes
2 cups flour
2 cups sugar
1/2 cup unsweetened cocoa
1 tsp baking powder
1 tsp baking soda
1/2 tsp salt
3 cups shredded zucchini
1 cup semisweet chocolate baking chips
1 cup salad oil
4 large eggs
In a large bowl, mix flour, sugar, cocoa, baking powder,
baking soda, and salt. Stir in zucchini, and chocolate chips. In a
small bowl, beat oil to mix with eggs; add to dry mixture and stir to moisten
well.
Line two large jelly roll pans with parchment paper, crease corners to fit and spread half the batter in each pan. Bake in a 325° oven until a toothpick inserted in center comes out clean, 15-20 minutes.
While cake is cooling make peppermint cream filling.
Peppermint Cream
2 sticks (1 cup) unsalted butter, softened
1 cup granulated sugar
1 cup whole milk
1/4 cup sifted all-purpose flour
1 teaspoons vanilla extract
1 1/2 teaspoon peppermint extract
red food coloring
Cream the butter with a mixer on medium speed until soft about 30 seconds. Add the sugar and beat on high speed until light and fluffy, 5 to 7 minutes.
In a small saucepan, combine 1/4 cup of the milk, the flour, and the vanilla extract, and whisk until there are no lumps. Over medium heat, slowly add the remaining 3/4 cup milk, whisking constantly, and cook until the mixture comes to a low boil. Then reduce the heat to low and keep whisking for a few more minutes, until the mixture starts to thicken.
Immediately remove the pan from the heat, but keep stirring and cool to room temperature. If necessary, place the pan over a bowl of ice water to stop the cooking process and allow the mixture to cool.
With the mixer on low speed, slowly pour the milk mixture into the butter-sugar mixture. Increase the speed to medium and beat until the frosting is light and fluffy, 3 to 5 minutes. Add peppermint to combine.
After cake has cooled use a heart shaped cookie cutter and cut out cake hearts and place on a clean piece of parchment. One pan had thicker hearts so I made those the bottoms and the thinner hearts the tops.
Place peppermint cream in a large ziplock bag, snip corner and squeeze out cream onto half the hearts and place a second heart on top.
Now you could stop here or you could keep going by cutting some heart stencils and and dusting the hearts with powdered sugar.
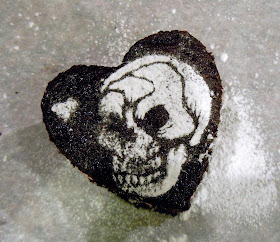
What can I say, Indigo and I were doing this together, lol |
Indigo perfected the dusting process by finding if you brush the remaining powder sugar off the stencil before lifting it you get a cleaner design.
Here's some of the stencils we made
Enjoy!
Check out all these LOVE infused tutorials
Jane LaFazio's Sketchbook page to Valentine Card (& envelope too)
Traci Bunkers, Printed Heart Ice Cube Trays: Quick Printed Backgrounds, Part 1
Diana Trout's, Woven Heart Valentines Card
Lyric Kinard's, Lovin' my Thermofax Screens
Judy Coates Perez Chocolate Peppermint Cream Heart Cakes
Diana Trout's, Woven Heart Valentines Card
Lyric Kinard's, Lovin' my Thermofax Screens
Judy Coates Perez Chocolate Peppermint Cream Heart Cakes
Kelli Nina Perkins, Monday, Jan 30 Heart shaped felted soap
Melanie Testa, Tuesday, Jan 31
Tracie Lynn Huskamp, Wednesday February 1 Valentines Message Pillows
Tweet
Saturday, January 28, 2012
Removing Color article Part 2
The second article in my 2 part series on alternative methods for removing color from fabric is in the February March issue of Quilting Arts magazine. This article focuses on several techniques using DeColourant, a product that removes color but also has the ability to put color back in at the same time. Because it is a thickened paste it can be applied with a paintbrush, painted over stencils or used with a thermofax screen. There are so many interesting possibilites to be explored with this product.
In the same issue there is also an article by Kathy York on making fabric houses with pictures of the Artist Village exhibit that she curated. As well as an article about the Between the Spaces exhibit.
Tweet
heARTfest Blog Hop Day 4
Get your heart on for this round of LOVE infused tutorials!
Check out Lyric Kinard's, Lovin' my Thermofax Screens
Jane LaFazio's Sketchbook page to Valentine Card (& envelope too)
Traci Bunkers, Printed Heart Ice Cube Trays: Quick Printed Backgrounds, Part 1
Diana Trout's, Woven Heart Valentines Card
Judy Coates Perez, Sunday, Jan 29, Chocolate Peppermint Cream Heart Cakes
Diana Trout's, Woven Heart Valentines Card
Judy Coates Perez, Sunday, Jan 29, Chocolate Peppermint Cream Heart Cakes
Kelli Nina Perkins, Monday, Jan 30 Heart shaped felted soap
Melanie Testa, Tuesday, Jan 31
Tracie Lynn Huskamp, Wednesday February 1 Valentines Message Pillows
Tweet
Friday, January 27, 2012
heArtfest Blog Hop Day 3
Get your heart on for this round of LOVE infused tutorials!
Check out Diana Trout's, Woven Heart Valentines Card
Jane LaFazio's Sketchbook page to Valentine Card (& envelope too)
Check out Diana Trout's, Woven Heart Valentines Card
Jane LaFazio's Sketchbook page to Valentine Card (& envelope too)
Traci Bunkers, Printed Heart Ice Cube Trays: Quick Printed Backgrounds, Part 1
Lyric Kinard, Saturday, Jan 28 Lovin' my Thermofax Screens
Judy Coates Perez, Sunday, Jan 29, Chocolate Peppermint Cream Heart Cakes
Kelli Nina Perkins, Monday, Jan 30 Heart shaped felted soap
Melanie Testa, Tuesday, Jan 31
Tracie Lynn Huskamp, Wednesday February 1 Valentines Message Pillows
Tweet
Thursday, January 26, 2012
heARTfest Blog Hop Day 2
Get your heart on for this round of LOVE infused tutorials!
Check out Traci Bunkers, Printed Heart Ice Cube Trays: Quick Printed Backgrounds, Part 1
Jane LaFazio's Sketchbook page to Valentine Card (& envelope too)
Tweet
Jane LaFazio's Sketchbook page to Valentine Card (& envelope too)
Diana Trout, Friday, Jan 27, Woven Heart Valentines Card
Lyric Kinard, Saturday, Jan 28 Lovin' my Thermofax Screens
Judy Coates Perez, Sunday, Jan 29, Chocolate Peppermint Cream Heart Cakes
Kelli Nina Perkins, Monday, Jan 30 Heart shaped felted soap
Melanie Testa, Tuesday, Jan 31
Tracie Lynn Huskamp, Wednesday February 1 Valentines Message Pillows
Off the Print Table fabric blog hop
My friend Lynn Krawczyk has been making fabric and you could be the lucky winner of a fat quarter of it! Just leave a comment over the next 5 days and on Tuesday I'll randomly pick a winner.
Here's what Lynn has to say:
"I never feel more connected to my art then when I print my own fabric. The only down side to it is that I often find myself wishing I had the space to print yardage and to duplicate the ones that I fall madly in love with. Now with Spoonflower I can!
And not only that, I can make it available for anyone else who finds it interesting and inspiring! There’s no better way to celebrate the opening of a new shop then to do a giveaway and not only ONE giveaway but FIVE!
Go take a visit to my Spoonflower shop
and pick out which print you like best. Leave a comment on this blog post and you’ll be in the winning to win a free fat quarter of the one you chose. Easy! And make sure you visit all the blogs on the blog hop for a better chance to win!"
Blog Hop Schedule
Mon Jan 23 - Lynn Krawczyk
Tues Jan 24 - Jo James
Wed Jan 25 - Kelli Nina Perkins
Thurs Jan 26 - Judy Coates Perez
Fri Jan 27 - Judi Hurwitt
Wednesday, January 25, 2012
heARTfest Blog Hop Day 1
Get your heart on for this round of LOVE infused tutorials!
Tweet
Traci Bunkers, Thursday, Jan 26
Diana Trout, Friday, Jan 27, Woven Heart Valentines Card
Lyric Kinard, Saturday, Jan 28 Lovin' my Thermofax Screens
Judy Coates Perez, Sunday, Jan 29, Chocolate Peppermint Cream Heart Cakes
Kelli Nina Perkins, Monday, Jan 30 Heart shaped felted soap
Melanie Testa, Tuesday, Jan 31
Tracie Lynn Huskamp, Wednesday February 1 Valentines Message Pillows
Monday, January 23, 2012
8 of Cups - finished
To finish the edge, I chose 3 different cords that picked up the colors in the quilt and used them to make a couched twisted cord binding.
DETAILS
Wednesday, January 18, 2012
In the home stretch...
The quilting is done!
I chose to do my curvy meandering fill stitching that is reminiscent of leaves and flourish-y shapes in the white background areas to contrast all the linear stitching on the cups and flourishes.
I stitched with Bottomline thread which is generally used in the bobbin, it's a lighter weight thread, because I wanted the stitched lines to be more subtle.
Next:
cropping and binding.
What I learned...
Because I like experimenting and trying things differently, I always learn something new with every project. Sometimes I discover a great new way of working and sometimes it turns out that my initial idea created unexpected challenges or wasn't as successful as I'd hoped.
As you may recall, I used wool rayon felt instead of batting, because I wanted a flat smooth finish for this piece. I used felt a friend had given me that she most likely had sitting around for about 15 years. I had two issues that popped up from using this.
The first one was the stiffness of the felt, compared to batting, made it more difficult for manipulating under the harp of the machine. I think 30 inches would be the widest I would recommend working with felt. Wider than that and I could see some definite limitations to quilting the surface smoothly. I had to roll and fold the piece to work the central areas which sometimes got a little cumbersome.
The second issue came about after I fused my top to the felt. I had a fair amount of rippling of the top due to it not fusing completely in all areas or staying fused for the duration of the quilting (it's possible there may have been a finish on the felt that kept it from adhering), as well as some possible shrinkage of the felt by the high temperature and steam used while fusing.
After the cups and flourishes had been quilted there was a significant amount of buckling in the white areas, I don't think the fusible web was even sticking anymore at that point, luckily the open areas were not very large, maybe 9" at the widest so it didn't present too much of a problem and it all smoothed out nicely with the quilting.
Conclusion: would I use felt again? Yes, but I would take size into consideration, if I was working on a particularly large piece I would probably use a lightweight batting instead. I would also pretest the wool to make sure I didn't have a problem with adhesion when fusing. I think a newer piece of wool felt wouldn't have had the adhesion problems that this one had, I suspect it had a finish on it.
Friday, January 13, 2012
8 of Cups progress
I decided to continue using monofilament for stitching the feathery flourishes since I do not want to obscure this part of the painted surface with lines of thread and because the monofilament is relatively clear, the more noticeable holes punched by the needle through the fabric gives another kind of visual patterning that I think is kind of interesting.
Next, I'll begin to fill in the white areas using Bottom Line white thread.
Chicago's first winter snowstorm today, stay warm.
Monday, January 09, 2012
Have you ever been challenged by monofilament?
Monofilament is clear thread, similar to a light weight fishing line that is a perfect solution when you need to add stitching but don't want the thread to be prominent. I personally love MonoPoly by Superior, it's a strong, matte, polyester thread that comes in clear for light to medium colors of fabric and smoke to be used with medium to dark colors.
Monofilament can be technically challenging when sewing if you don't make a few tension adjustments to your machine and adjust how your spool unwinds.
The biggest problem: Tangling and breaking. When you slow down or stop sewing and the tension is let up on monofilament, because of its natural elastic springy nature, it keeps unwinding and spins around the back of the spool, causing the thread to break.
Tweet
Monofilament can be technically challenging when sewing if you don't make a few tension adjustments to your machine and adjust how your spool unwinds.
The biggest problem: Tangling and breaking. When you slow down or stop sewing and the tension is let up on monofilament, because of its natural elastic springy nature, it keeps unwinding and spins around the back of the spool, causing the thread to break.
Using a thread stand helps but, as soon as the tension is off (ie slowing down or stopping) the thread tends to spin around the spindle either above or (worse) below the spool. Snap!
Solution: place the spool in a bowl next to the thread stand and run the monofilament up through the top hook of the stand and then over to the machine.
Use a thread guide on your thread spindle to help control that active thread.
Second problem: Tight thread tension. Monofilament, like metallic thread, requires a looser tension setting on the machine.
Solution part 1: Loosen the top thread tension, the lower the number the lower the tension.
When I first started quilting 20+ years ago, it was not recommended to put monofilament in your bobbin as well as the top. I can no longer remember exactly why, but I've never had a problem, maybe the quality of the thread is a lot better now. Also some machines are just finicky about thread, if your machine has issues, try something like Bottom Line in the bobbin.
Solution part 2: Loosen the tension on the bobbin case. Make a quarter turn on the top larger screw, usually counter clockwise. I guess that depends on how you're holding the bobbin, for mine if the thread is on the left side, it's counter clockwise.
It's easy to check if it's looser by letting your bobbin dangle when holding the thread. It should drop down a little bit. If you are afraid to mess with the tension screw on your bobbin case, buy another spare and mark it with a dot of fingernail polish.
Lastly I recommend using a top stitch needle, my favorites are the titanium ones.
Following these easy steps you should never have problems stitching with monofilament.
Tweet